
ReceptionBot
코드는 깃 저장소 참고!
[TOC]
I. Google STT
참조: http://jeongchul.tistory.com/544
1. Google Cloud 프로젝트 생성하기
참조1: https://cloud.google.com/speech 참조2: http://jeongchul.tistory.com/544
2. Google Cloud Speech API 추가
참조1: https://console.cloud.google.com/flows/enableapi?apiid=speech.googleapis.com 참조2: http://jeongchul.tistory.com/544
3. Google Cloud SDK 설치
참조1: https://cloud.google.com/sdk/?hl=ko 참조2: http://jeongchul.tistory.com/544
3.1 Mac OS X
- 적정한 곳에 아래와 같이 GoogleCloudSDK 폴더 생성 및 해당 폴더로 이동한다.
$ mkdir GoogleCloudSDK
$ cd GoogleClooudSDK
- 상기 참조1 사이트에서 OS에 맞는 설치폴더 다운로드 (google-cloud-sdk)하여 위의 GoogleCloudSDK 폴더에 이동한다.
- 다음과 같이 설치를 시작한다.
$ sudo ./google-cloud-sdk/install.sh
- Y, Y, Enter 입력한다.
$ source ~/.bash_profile     # Linux: source ~/.bashrc
$ sudo gcloud init
- Y를 눌러서 로그인 한 뒤, 맨 처음 1에서 생성한 프로젝트 선택 (필자의 경우: chatbot-215901)
3.2 Linux
- Linux 설치
# --- Create environment variable for correct distribution
$ export CLOUD_SDK_REPO="cloud-sdk-$(lsb_release -c -s)"
# --- Add the Cloud SDK distribution URI as a package source
$ echo "deb http://packages.cloud.google.com/apt $CLOUD_SDK_REPO main" | sudo tee -a /etc/apt/sources.list.d/google-cloud-sdk.list
# --- Import the Google Cloud Platform public key
$ curl https://packages.cloud.google.com/apt/doc/apt-key.gpg | sudo apt-key add -
# --- Update the package list and install the Cloud SDK
$ sudo apt-get update && sudo apt-get install google-cloud-sdk
$ gcloud init
4. Google Cloud Service Account Key 생성
참조: https://cloud.google.com/iam/docs/creating-managing-service-account-keys
- json 파일 생성
- Google Cloud Platform 외부, 즉 다른 플랫폼이나 온프레미스에서 서비스 계정을 사용하려면 서비스 계정의 신원을 입증해야 함. 공개 키/비공개 키 쌍이 여기에 사용됨.
- 아래 예에서 SA-NAME은 서비스 계정의 이름이고 PROJECT-ID는 Google Cloud Platform 프로젝트의 ID임. Google Cloud Platform 콘솔의 서비스 계정 페이지에서 SA-NAME@PROJECT-ID.iam.gserviceaccount.com 문자열을 검색할 수 있음.
#------------------------------------------------------
#$ gcloud iam service-accounts keys create ~/key.json \
#    --iam-account SA-NAME@PROJECT-ID.iam.gserviceaccount.com)
#------------------------------------------------------
$ sudo gcloud iam service-accounts keys create ~/jschoi_gcloud_service_accounts_key.json --iam-account jschoi@chatbot-215901.iam.gserviceaccount.com
- 테스트를 위해 sync-request.json 파일 생성
- Google Auth Library 액세스 허용
$ vi sync-request.json
{
  "config":{
    "encoding": "FLAC",
    "sampleRateHertz": 16000,
    "languageCode": "en-US"
  },
  "audio": {
    "uri": "gs://cloud-samples-tests/speech/brooklyn.flac"
  }
}
- access-token 발급하기
$ sudo gcloud auth application-default login
- 이후에 application_default_credentials.json이 저장된 경로를 복사하여 export 함.
$ export GOOGLE_APPLICATION_CREDENTIALS=~/.config/gcloud/application_default_credentials.json   #  필자와 경로가 다를 수 있으니 주의
$ sudo chown -R $(whoami) ~/.config/gcloud/application_default_credentials.json
- (~/.bash_profile 또는 ~/.bashrc에 포함시킬 것)
- access-token 확인 및 복사해두기
$ sudo gcloud auth application-default print-access-token
- 다음의 명령어에서 “access-token” 에 들어갈 부분에 위의 access-token을 집어넣고 다음의 명령어를 입력함.
$ curl -s -H "Content-Type: application/json" -H "Authorization: Bearer access_token" https://speech.googleapis.com/v1/speech:recognize -d @sync-request.json
- 다음과 같이 출력됨을 확인
{
  "results": [
    {
      "alternatives": [
        {
          "transcript": "how old is the Brooklyn Bridge",
          "confidence": 0.98360395
        }
      ]
    }
  ]
}
5. portaudio19 설치
Linux Ubuntu
$ apt-get install portaudio19-dev
Mac OS X
http://portaudio.com/docs/v19-doxydocs/compile_mac_coreaudio.html
$ ruby -e "$(curl -fsSL https://raw.githubusercontent.com/Homebrew/install/master/install)" < /dev/null 2> /dev/null
$ brew install portaudio
II. Naver TTS
- 네이버 클라우드 가입 https://www.ncloud.com
- 네이버 CSS API 사용하기 http://docs.ncloud.com/ko/naveropenapi_v2/naveropenapi-4-2.html
- 만약, certificate verify failed 에러 발생 시, 다음 사이트를 참고하여 수정 http://krksap.tistory.com/1226
III. Source Codes
$ git clone https://github.com/cjs0818/receptionbot.git
$ cd receptionbot
In OSX, portaudio needs to be installed for PyAudio like
$ brew install portaudio
python3 virtualenv
$ virtual env -p python3 venv3
$ source venv3/bin/activate     # 가상환경 끝낼 때는 deactivate를 입력할 것
$ python3 install -r requirements.txt   # OSX에 맞게 선택 OSX: requirements_osx.txt,  Ubuntu: requirements_docker.txt
Run
$ python3 main.py
Test submodule
Danbee.ai <-> Basic user client
- Danbee 사이트 회원 가입 https://danbee.ai
음성합성
- 기본 파일
tts/naver_tts.py
- 실행방법
  $ cd tts
  $ python3 naver_tts.py
음성인식
IV. Architectrue
There are several options.
- User Web API as a Client
| Client | Server1 | Server2 | |
|---|---|---|---|
| 1.1 | User Web Client | Chatbot (Danbee) | Heroku App. w/ CSV file |
| 1.2 | User Web Client w/ CSV file | Chatbot (Danbee) |
- SNS (Kakao Talk) as a Client
| Client | Server1 | Server2 | |
|---|---|---|---|
| 2.1 | SNS (Kakao Talk) | Chatbot (Danbee) | Heroku App. w/ CSV file |
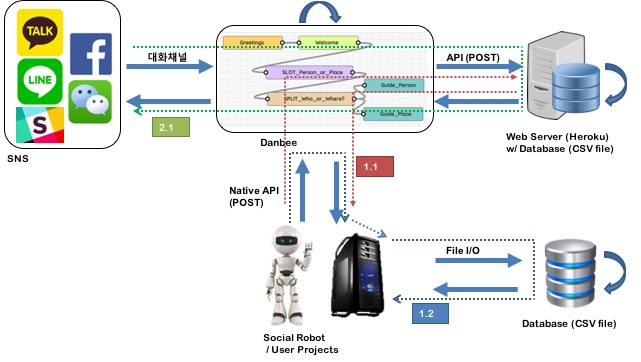
What do we need for ++ReceptionBot++?
- Chatbot Platform - ++Danbee++ (http://danbee.ai)
- Web API server - ++Heroku++ (http://www.heroku.com)
- User Web client or SNS (ex. Kakao Talk)
Steps
User Projects <-> Danbee
- Make your Bot (ReceptionBot) and a Chatflow in the Bot. (Remember you Chatbot ID in Settings)
- Add the following codes in your projects
    # --------------------------------
    # Danbee 요청
    # --------------------------------
    data_send = {
        'chatbot_id': 'c54e4466-d26d-4966-af1f-ca4d087d0c4a',  # Chatbot ID
        'input_sentence': text
    }
    data_header = {
        "Content-Type": "application/json;charset=UTF-8"
    }
    danbee_chatflow_url = 'https://danbee.ai/chatflow/engine.do'
    res = requests.post(danbee_chatflow_url,
                        data=json.dumps(data_send),
                        headers=data_header)
    # --------------------------------
    # 대답 처리
    # --------------------------------
    data_receive = res.json()

    message = data_receive['responseSet']['result']['result'][0]['message']
Git & Heroku
-
Git add & commit
$ git add . $ heroku git:remote -a <app_name> $ git commit -am "modified" -
Modify your codes (main.py for Heroku server, webclient.py for User Web Client)
$ git add . $ git commit -am "label_you_want" -
Upload to Heroku
$ git push heroku master -
Execute Heroku
$ heroku ps:scale web=1 -
Check the log of Heroku
$ heroku logs --tail
$ heroku local web      # In local computer